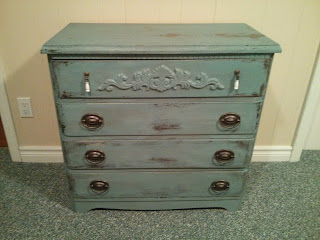
I love the shabby chic look and have been admiring all the milk painted furniture on Pinterest. I have never used this before. But I love the fact that there is no prep work involved. I hate sanding before refinishing a project. I also love that it is all natural. I am often made fun of by my family for being a hippy. That would be my inner hippy coming out. If you are unfamilliar with milk paint here is a description from www.missmustardseedmilkpaint.com/about
"Milk Paint is an ancient all-natural paint containing basic ingredients including milk protein (casein), limestone, clay and natural pigments. When absorbed into the surface, Milk Paint will never chip or peel. It is suitable for both interior and exterior applications and is naturally mold resistant. Milk paint provides a completely breathable coating and is ideal for painting wood, plaster, drywall and a variety of other surfaces. It is environmentally friendly, non-toxic and contains no VOCs.
With the Milk Paint Bonding Agent you can use Milk Paint on even more surfaces such as previously painted walls, varnished surfaces, ceramic tiles, metal, glass etc. Without the bonding agent, Milk Paint will resist some prefinished or prepainted surfaces to achieve an authentic “chippy” look."
I was able to find a retailer of Miss Mustard Seed Milk Paint near by and grabbed myself Linen and Kitchen Scale. I also invested in some of the Miss Mustard Seed antique wax. See the colours here:
http://www.missmustardseedsmilkpaint.com/colors/
This piece was on the side of the road. There was no major repair work. It just had ugly wooden handles on it that needed to come off. It was also extremely plain! So I went to a local liquidator who sells cabinet pulls and some mouldings etc. I picked up a dental moulding and a fancy applique to add to the top drawer. I did not take a picture before the handles came off. My dear father did all the work of chiseling off the old glue and handles. He also helped me to glue and nail down the extra mouldings. Here is a picture of the piece with the bling added:
I mixed the kitchen scale with some Ironstone to make a softer green. I did not use the bonding agent as I wanted it to be chippy and rustic looking. Next time I would paint the additions so that they Show up a little better when distressed. I think this extra step would be well worth it.
I mixed enough paint to do two coats. Again, I do not have any pictures of the coats of paint going on. But I found that it went on very well. It was a little streaky until the second coat. However, that is all part of the charm. I then took a paint scrapper to the dresser lightly going over areas where the paint had lifted. The paint did not lift on the drawers due to all the sanding required to remove the glue. I just took some sand paper to it and the paint distressed relatively easily. Here is a picture after two coats and the chipping/distressing.
The Miss Mustard Seed wax went on like butter! It was really nice to work with and gave more antiquing colour than the Minwax antique wax. I put on two thin coats. When waxing, the thinner the better.
I then went to the local liquidator and found some beautiful pulls for the drawers. I really wanted porcelain drop pulls. But I could only find ones that were complimented with gold. So my father once again used his handyman skills and spray painted the metal to resemble the other pulls I had chosen. They look fabulous. Here is the finished product:
Unfortunately it kind of blends with the carpet, which will be replaced in the near future. However, I am so pleased with my very first milk painted project. I will definitely be using it in the future. Next project I will ensure to take more pictures and share every step of the way.


No comments:
Post a Comment