Labels

Showing posts with label Recipes. Show all posts

Monday, December 2, 2013

Minced Beef and Portobello Mushroom Pie

Dale and I were gifted a 1/4 of a cow for Christmas. So I needed a recipe to use it in.  It has become a little more difficult as I have found out I have a sensitivity to tomatoes.  So no more bolognase sauce or chilli or sloppy joes for me.  All of which are staples in our home. So I decided to become creative and came up with this recipe:


2lb Ground Beef
6-8 Portobello Mushrooms
1 Lg Onion
1 1/2 cups Wine (red or white would work fine)
4 cups Beef Broth
1 1/2 tbsp Corn or Potato Starch
10 fresh Sage Leaves
10 sprigs of Fresh Thyme (leaves only)
1 1/2 tsp Pepper
1 tsp Salt
10 medium Sized Potatoes
2 lg Cloves of Garlic

Cook up your ground beef in a skillet being carful not to brown. Remove beef and drain off any excess fat.

Wipe clean mushrooms with a damp papertowel.  Cut Portabello mushrooms into 1/2 inch cubes and begin to fry in the same skillet.  Once mushrooms have begin to soften add your onion.

Once both mushrooms and onion are soft but not overly brown deglaze your pan with the wine.

Add 3 cups of the broth, reserving the last cup to mix with the corn or potato starch.  Combine and add to skillet.

Add beef back to pan along with sage, thyme, pepper and salt.  Bring liquid to a boil so that it can thicken then turn back to summer for 5 minutes.  Add garlic in when you turn it down to simmer.  This allows for a fresher garlic taste in the finished product. Taste mixture and add more salt or pepper to taste.

You may add Peas or frozen vegetables of any kind to make this a balanced meal.  I served mine with a salad.

Add mixture to a deep casserole dish or cast iron pot.

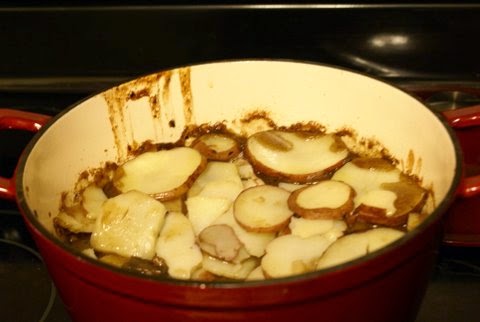
Slice potatoes evenly.  I use a mandolin to achieve even slices.   Add to a pot of water and boil until potatoes begin to soften.  Drain and place potatoes in even layers over the beef mixture.

Freeze for a later date or place in oven for 45 minutes at 350 uncovered.  Turn on broiler for last couple of minutes to crisp up the potatoes.

Tuesday, September 24, 2013

Did you know you can make your own baking powder?

So how did I find this out you ask?  I was home alone with the girls this evening and wanted to make some "clean eating pumpkin bread" for a coffee date I am having tomorrow, but remembered I was out of baking powder...

So I thought to myself,  Dale can stop at the 24 hour Sobeys on the way home and grab some. I will get everything ready and bake the bread in the morning.  As I was messaging Dale and sending him a link of the aluminum free brand I use, I found this:

http://frugalliving.about.com/od/condimentsandspices/r/Baking_Powder.htm

So, I made some.  And my bread rose better than the last time I made it!  It was only baking soda and cream of tartar.  Both of which many people have on hand.  So next time you are in a pinch or want to reduce your exposure to aluminum make your own.

Thursday, September 12, 2013

Brockelbank Sisters Imitation Harvey's Dill Pickles Recipe

Two years ago Crystal and I embarked on a journey to can everything we could, to reduce our exposure to BPA and Pesticide residues.  There was something exciting about canning produce and knowing exactly what is in the jar.  No unpronounceable additives. Also, picking the freshest produce creates a wonderful flavour you cannot get with store bought jars.

This turned into a lot of work! Especially since we canned, JalapeƱos, Peach Salsa, Tomato Salsa, Pickled Green Beans, Diced Tomatoes, Dill Pickles and Pumpkin.  Canning our own food quite frankly became an addiction.  It is a good thing that Crystal kept talking me into going to the marked and just doing one more half bushel of pickles.  Because the following year there was a newborn in the house and no canning got done.

We must have lucked out because our dill pickles were a huge hit!  We believed that they rivaled Harvey's Hamburger pickles, which are famous in our family.  We had never done pickles before but looked up a bunch of recipes online and came up with this:


What you Need:

1/2     Bushel Pickling Cucumbers
3.5     Red Peppers (chopped finely)
3        Bunches Dill Weed
2 lg    Heads Garlic
1.5     Bags Chilli Pepper Flakes
5 3/4  Cups White Vinegar
1 1/2  Cups Pickling Salt
22      Cups Water

20      Quart Jars (Widemouth are the easiest to stuff)


Now What???

1. Sterilize all your jars in the dishwasher or boil for 10 minutes.  Dishwasher is way easier and can be done while you sleep the night before pickling.

2. Decide how you would like your pickles cut or if at all.  Do the cutting.  Using a mandolin can make for quick, even slicing especially with larger pickles.  Hint: Larger Cucumbers require some slicing but are usually cheaper.

3.  Line up the Jars and add to each Jar:

2 tsp Chili Flakes
2/3 of an extra large garlic clove or 1 average size cut in half
2 tbsp Chopped Red Pepper
2 Heads of Dill Weed along with some stalk

4.  Stuff cucumbers in Jars so that they are packed tightly.  Do not allow pickles to rise above neck of jar as this would impede the canning process.

5. Add vinegar, salt and water to a large pot and bring to a boil.  

6.  Add Snap Lids to a pot of water and boil for 5 minutes.

7. Pour the hot brine over jars of pickles leaving a 1/2" head space.

8.  Remove a lid carefully and place on top of jar without contaminating the inside.  Screw ring on firmly but not too tightly.  As it will allow air to escape during processing.  But you want the ring tight enough that the lid is held firmly in place.

9.  Add jars to canner and fill water until it reaches the bottom of the jar necks.  

10.  Bring water almost to a boil and remove jars.
11.  You must empty the canner and add cool water before processing your next batch of pickles.  This will prevent breakage of jars as well as keep your pickles crisp.

12.  Adding brine just before processing will also help keep pickles crisp.  As they will not have to be heated twice: once by the brine and second time by processing.

Let your pickles sit for 8 weeks and Enjoy!!!


Saturday, July 27, 2013

Homemade Coconut Milk Infant Formula

First off I would like to say that I am sharing with you my experience with two daughters that struggle with dairy allergies.  I have no background in nutrition or medicine.  So, please check with a holistic nutritionist or naturopath before starting a new diet with your infant.

I feel like I want to share this with everyone because it has changed our life so much!  When my second daughter was born I was sure that breastfeeding was going to go well.  I had difficulty with my first daughter and was only able to breastfeed 1/2 time for 7.5 months.  This time I was determined to do everything to make it work!  I fed on demand, even though she was screaming for food a mere 20 minutes after breastfeeding, I pumped in between feeds, I took Blessed Thistle, Fenugreek and Domperidone. I was told over and over again by moms and professionals, the more you take the more you make.

However, in my case, that was not true.  I have  condition called Mammary Hypoplasia.  In a nutshell, I do not have sufficient glandular tissue to hold enough milk to give my baby a full feed.  Therefore, my body is producing as much milk as it can hold.  But that storage is not big enough to satisfy my 9.5lb babies.  If you have struggled with breastfeeding and would like information on this condition please refer to the below link for information:

http://www.llli.org/llleaderweb/lv/lviss2-3-2009p4.html

So, I had to supplement my daughter within her first days after birth and was not able to breastfeed full time.  I had come to terms with that when around 4.5 months old I noticed an intestinal bleed.  She had also struggled with eczema from birth and was a terribly fussy baby, often waking 3-4 times a night.  The family doctor told us that it was a dairy allergy.  The proteins in the milk were causing damage to the intestines.  I did not want to put my daughter on soy formula due to the phytoestrogens and she would not take the hypoallergenic formula (due to the sour taste).  So the family doctor told me I would have to keep her on the dairy formula.

It was then that I was determined to find a better answer.  My daughters intestines were bleeding and I should just keep on doing what I am doing???  I made an appointment with a local naturopath and described my plight to him.  I also explained to him that I did not want to go on soy formula.  It was then that his receptionist found a rice milk based infant formula recipe from this blog:

http://jennpike.wordpress.com/2010/01/09/home-made-rice-milk-based-infant-formula/

There is a ton of information posted in the comments section of the blog.  So the naturopath sent us on our way to make our own formula.  I chose to use coconut milk.  I feel it has a pleasanter taste than rice milk.  It also has some healthy fats.  Here is what we do as adapted from Jenn Pike's Blog:

4 cups Coconut Milk (So Delishious)
2 tbsp Brown Rice Protien (Heartland Organics)
1 tbsp Molasses (Wholesome Foods)
2 tsp Pediatrivite (Genestra)
4 Scoops Infant Probiotic (Genestra)
2 tbsp Flax seed oil
400 Iu Vitamin D


Within 2 days my 5 month old was able to sit happily playing on the floor for 45 minutes instead of her usual 5 minutes.  She also began waking once a night and eventually slept through the night.  My daughter did a complete 180.  She went from pooping once every 3 days to pooping 3 times a day.  She is now 1 year old and growing like a bad weed.  I am so thankful for this recipe.  It made the latter half of our first year one to enjoy.  Instead of sleep deprived and completely frazzled I have fond memories of our first year together.  I cannot express what a difference this made in our life.

I love that this formula has whole foods in it.  There are no ingredients in it that I cannot pronounce. If I knew about this the first time around my older daughter would have been on it as well.  If we have any future children they will also be on this formula, allergies or not.

If you are in the Waterloo Region of Ontario you can consult with Dr. Dronyk ND of the Dronyk Clinic: http://www.dronykclinic.com/en/

Tuesday, June 25, 2013

Clean Eating Pumpkin Bread


This is a recipe I came up with to accomodate my family's sensitivities.  It is made with Spelt flour and sCoconut Palm Sugar.  Coconut Palm sugar is a healthier option because of its potassium, iron and vitamin content.  We exclusively use this sugar in our home.  This is still sugar and should be used in moderation.  Here is a clip from Dr. Oz coconut palm sugar:

http://www.doctoroz.com/videos/coconut-palm-sugar-best-new-sugar-alternative

Coconut Palm Sugar also has a low glycemic index.  Here is an explanation:

http://coconutpalmsugar.com/Glycemic_Index_Explained.html


1/2 Cup Coconut Oil
1 Cup Coconut Palm Sugar
2 Eggs
1 Cup Pumpkin Puree
1/4 Cup Water
1 tsp Vanilla
1 3/4 Cup All Purpose Spelt Flour
1 tsp Baking Soda
2 tsp Baking Powder
1 tsp Pumpkin Pie Spice
1 tsp Cinnamon


Combine Coconut oil and Sugar with mixer.  Once combined, add eggs, pumpkin puree, water and vanilla.  Combine dry ingredients in a seperate bowl.  Add ingredients to mixer.  transfer to a loaf pan and bake @ 350 for 50 minutes.  Remove from oven and let cool on a wire rack.


Monday, June 3, 2013

Cold Chaser Thai Soup

This soup recipe quickly became my favourite after I discovered Thai Chicken Soup at a local restaurant.  I was looking to be inspired by both clean eating and a low carb option.  I normally leave out the rice noodles and add extra bean sprouts.  Inspiration for this recipe came from my knowledge of hot and sour soup and further researching flavours in thai soups such as, Tom Yum and coconut curry.  It quickly became a family favourite and I have made pots upon pots by request for my Mom and sister Amber.  Even my niece at 10 months laps it up.

This soup freezes extremely well in Mason jars (as you will see in other blogs, I love my mason jars for meals).  Make sure to leave enough head space to avoid breaking the jar.  This is especially helpful for families on the go or shift workers like myself. I have become the envy of the lunch room, as the aroma of this soup fills the break room.  This soup is especially beneficial for those suffering a cold, due to the large amounts of ginger and garlic. The stock preparation can be used with your favourite chicken soup recipe to increase its cold fighting power and give it a little thai-spiration.


The Cold Fighting Stock
1 1/2 Box Chicken Stock
2 Cloves of Garlic (chopped finely)
2 Stalks Lemongrass (outside brown leaves peeled and cut in rounds 3/4 of the way up the stock. discard top 1/4 of stock as it is bitter)
4" Piece of Ginger (chopped finely)

Main Soup Ingredients
2 Cans Coconut Milk
2 1/2 - 3 tbs Red Curry Paste
2 Tbsp Fish Sauce
1 Tbsp Soy Sauce
1 1/2 tsp Worcestershire
2 Tbsp Sweet Thai Chilli Sauce (or 1 tbs of Chili Garlic Sauce and 1 1/2 tbs Honey and 1 tsp Sambal Oelek)
3 Tbsp Ginger (finely grated)
1 Tbsp Rice Vinegar
Zest and Juice of 1 Lime
3 large Shallots (thinly sliced)
2 Chicken Breasts (thinly sliced)
8 oz pre-sliced Cremini Mushrooms
5 oz Matchstick Carrots
1/2 lb Baby Bok Choy (Chopped and white end discarded)
1/2 Bunch Cilantro (roughly chopped)

Finishing the Soup
Zest and Juice of 2 Limes
1/2-1lb of Bean Sprouts
1/2 Cilantro Bunch (roughly Chopped)
1 Cup Fresh Pineapple (small bite sized)

Garnishing & Serving
Chopped Tomato
Chopped Cilantro (The second half of the bunch)
Finely Chopped Mint (few leaves per bowl)
Lime cut into wedges
Rice noodles

Add Chicken Stock, Garlic, Lemongrass, and Ginger to a large soup pot.  Bring to a boil and turn down to a simmer for 30 minutes covered.  Strain broth and add back to the pot.


Add, Coconut Milk, Red Curry Paste, Fish Sauce, Soy Sauce, Worcestershire Sauce, Sweet Chili Sauce, finely grated ginger, Rice Vinegar, Zest and Juice of Lime and shallots.  Bring back to a boil and add Chicken. Allow to cook for 10 minutes then add: Mushrooms, Carrots, Bok Choy and Cilantro.   Bring to a boil and reduce to a simmer for 10 minutes.


Adjust soup to taste by adding more, Sambal Oelek, Red Thai Curry Paste and Ginger.


Take soup off heat.  Add zest and juice of 2 limes, Bean Sprouts, 1/2 Bunch of Cilantro and Pineapple.

Laddel hot soup over vermicelli rice noodles and diced tomato.  Top with fresh cilantro, fresh mint leaves, and a wedge of lime.   Allow soup to sit for 3 minutes to allow noodles to cook.


Let guests add extra spice with Sriracha and to cool down those tastebuds a Cool Coconut Smoothie coming soon to the blogs.

Signing off with a smile and a happy heart! Thanks for letting us share a little piece of home with you.
Crys